Wednesday, January 3, 2007

Patterned Bladesmithing

It is now winter 2003-2004, after reading my newly acquired literature on Bladesmithing I decided to deviate from Rapier to Viking Broadswords. First I would try stacking 3 different bars of steel, each with 100 layers. All 3 bars are manipulated differently for contrasting patterns.
The practice of this kind of stacking is getting my skills prepped for the Viking sword, composite construction. A letter opener/ want to be dagger was first. It was made with 2 twisted bars and middle serpentine patterns (which split apart in a welded section). Oops!
Next, was the Kukris style-leaf looking blade. I probably should have actually looked at a Mideastern style blade before I made this one, too late now. One Damascus bar on the top edge was not manipulated, serpentine in the middle with a twisted waterfall on the cutting edge.


At last confidence in composite construction, one step closer to the Nordic sword.

The Viking Broadsword

With confidence in tact, I started with 6-3 foot patterned bars. 3 of which are forge welded together end to end on one side of mild steel. Then I repeated it the same way again on the other side. Now the cutting edge would be 200 layers of high carbon steel notched and then flattened for the pupose of patterning. Then I continually welded around the core from point to guard in one piece.


This is the example of this procedure if the sword was cut and you are looking at the inside construction. The gray color being the mild steel center, the blue color being the patterned steel, and the purple or fushia being the outer cutting edges.

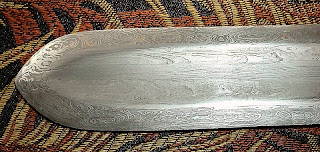
I can see why these blades can be masterpieces, because the multiple patterns can be absolutely beautiful. It took me 7 days to construct my first Viking broadsword.
My wife, Linda being a daughter of a Norwegian immigrant requested a Viking broadsword, so I was eagar to oblige her. With my stamp on one side and a double L stamp for Linda Lou on the other side.
With the trait of grand chivalry, My queen is presented the Viking Broadsword

The Quest continues...


It's now spring 2004, searching for information I bought a "Blade" Magazine and found that there was a knife show in Eugene, OR. This was a must do! So Linda and I made arrangements to check it out. I had never been to one before this.
Thru my forging blade endeavors I had met up with a fabricator and tool man named James at my supplier who was interested in blades himself. In this quest for information on bladesmithing sharing information is crucial. His knowledge of Metallurgy and products brings welcome advice and updates.
James attended the knife show as well with his wife Jenny. This show was absolutely huge! Masters of all aspects of Bladesmithing, Knife making, and artisans of patterned steel from simply breath taking to extremely complex matter of artwork. You really have to see it to believe it. This inspired me to make some smaller blades.
Practice the Damascus
I decided to make a few skinner type knives. Try testing for hardness and practice suface manipulations also simple twisted laminates. So that I did...I don't consider myself a knife maker, but I will try to learn.
So I produce a few...one in particular was manipulated different on each side, It was laying on the dining room table as an exampleof the Damascus steel blade for family and friends to see when visiting. Jerry and Rosa, long time family friends (and the best salsa makers ever) from Silver Lake, WA came to visit. Jerry liked the skinner and also a filet knife I made. He wanted to make a trade with me...His black powder Hawkins 50 cal. rifle with extra 54 cal. barrel and all the accessories for the two blades and 1 more filet knife in his design customized just for him. I like black powder weaponry so I agree to trade and proceeded to forge his custom filet. I added a bronze fish head and tail on the handle trying to give him a little extra for his original. It turned out beautiful and now I'm the proud owner of a Hawkins black powder rifle 54 cal. and 50 cal. and its a nice addition to my 50 cal. Kentucky pistol.


BOSOM KNIFE AND BODICE KNIFE (BELOW)
DAMASCUS (NICKLE SILVER-1095)
CORE- (01-1080) 175 LAYERS,
COCO BOLO W/ BRONZE CASTED FITTINGS

LASTLY IS THE ROCKY MOUNTAIN HUNTER AND THIS WAS A MATCHING PAIR (OTHER NOT SHOWN)


LARGE DROP STYLE SKINNER
DAMASCUS (01-1080) 27 LAYERS
MAHOGANY HANDLE W/ MOSIAC PINS

D-Ring Bowie style Knife


Damascus blade and Guard with Mahogany handle

The Beginning Journey into Damascus Swordsmithing 2003


SWEPT HILT RAPIERS
DARK HANDLES
326 LAYERS, (S7-MILD STEEL) MAHOGANY
CENTER-FLAMBURG
STAINLESS STEEL W/BIRCH HANDLE


First of all, Let me thank you for visiting my page...
How I got started.
In the fall of 2003, sitting on the couch after a hard days work or at least a semi-hard days work.
Being a frontier gamer in the days when Pong and Atari were the thing, I retreated to the leisure of playing Xbox...Disney's Pirates of the Caribbean was the game of choice. The blades used in this game by the characters were detailed in their own style, with information that placed them in a certain period with the purpose and quality explained.
Well, I got curious...and went to the computer and punched in the names of some of these swords, Such as the Schiavona, Swiss Flamburg and . etc. Much to my surprise these were real blades although some were exaggerated. The museum pieces and original pieces intrigued me to delve further in my quest for information about original swords.
I stumbled on an obscure site of a man in Europe (England maybe) who was making an original piece. A Swept Hilt Rapier I believe. He started with three pieces of steel to make the Damascus, 1 hard and 2 soft, W2 and 203E I believe. He went thru the process of folding the steel and completeing a hilt (handle) the finishing touch was a gold star. The process was in text only, I wished that there had been pictures because I am visual. After discovering this information I thought S*** I could do that!
So I walked in my blacksmith shop...and I scanned the area for a couple bars of soft steel, then I just needed one hard steel bar. I thought well, I have no idea what W2 is and much less 203E. But I did know that my pritchell was pretty damn hard. Alas that will be the materials for my Bilet. (S7 sandwiched between 2 mild steel bars)
I knocked the cobwebs off my coal forge and built my fire and went to work. It was welded successfully! 300 layers was my goal, After 1 fold of the steel, I thought Bull S*** this is a job for "Squeaky" my 50 lb little giant trip hammer. I plugged him in and let him rip. At about 150 layers my bilet started cracking on the ends so I quit while I was ahead. I made my tang and drew the blade and fullered a groove down the middle. It was looking pretty damn rough being the first one...But I cussed it together!
I was really excited to see this pattern expose itself as I was hammer finishing...I laid it across my coal forge fire to lightly soak, My attention was diverted to my wife as she walked in the door to show me something in a magazine. She asked how my project was going? I turned back towards my forge with a gasp; My 48" rapier was burnt into 2 pieces with white sparks dancing in the blast of my forge. I said "Darlin' you might want to leave now" I collected my thoughts and kept my temper under control and decided "damn it" I'm gonna make something out of this! It's way to much work to just throw away and I have to see what it looks like in at least some sort of blade. And.... Vu lah! my first dagger/letter opener, loose fitting and all was born.
Etched in vinegar vapors, the blade revealed a very contrasting patterns against my choice of steels. This pattern in the steel intrigued me greatly. I had started a quest to collect information and continued forging Damascus.
So, now begins my journey towards SwordSmithing
First of all, my goal is to reproduce the Schiavona, a 17th century masterpiece in its original form. With an exception I'll use higher quality steels for usability reasons.Before attempting this I must familiarize myself with metallurgy, history, soft metal casting, woodworking, leather working and basic swordplay. No small task.
I decided to begin with Rapiers and Daggers. To march forward with me in this adventure is my wife Linda; she currently assists me greatly in my business. Linda is equipped with a digital camera and computer skills as well as communicating with people that are beyond my comprehension, which in turn makes this possible for me to bring you this website. Both of our skills in each of our areas increase rapidly with each new challenge.
My first completed blade was the Swept hilt Rapier, with a single fuller on both sides of the 320 layer S7-Mild steel blade, two ring guards and a mahogany handle. This took many countless hours and days to create.
During the period of making this blade, I needed information so looking at the books that were advertised on various websites I decided: Jim Hrisoulas was the way to go. I held off on buying any new books because my Farrier business is slower coming into winter. I created a wish list for Christmas which included the books I needed. Meanwhile I practiced just forging blades from mild steel, making sabers, rapiers etc.
Then Came Christmas 2003 and lo and behold Linda must have passed on my list to my Mother and she sent me "The Complete Bladesmith" and "The Master Bladesmith " By J. Hrisoulas. Hungry for information my nose was constantly buried in the books, thousands of possibilities were now in front of me.
Now my second rapier was an attempt at a ladder pattern, which turned out to be something else! Nevertheless,it was assembled into a Swept hilt similar to the first with no fuller.
The third blade was an attempt at a Flamburg, using stainless steel. The grinding work was grueling but finally assembled with a 3 ring swept hilt and birch handle.
Wade Seiders
Blacksmith, Bladesmith and Farrier