Patterned Bladesmithing
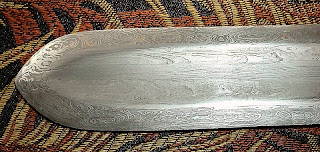
It is now winter 2003-2004, after reading my newly acquired literature on Bladesmithing I decided to deviate from Rapier to Viking Broadswords. First I would try stacking 3 different bars of steel, each with 100 layers. All 3 bars are manipulated differently for contrasting patterns.
The practice of this kind of stacking is getting my skills prepped for the Viking sword, composite construction. A letter opener/ want to be dagger was first. It was made with 2 twisted bars and middle serpentine patterns (which split apart in a welded section). Oops!
Next, was the Kukris style-leaf looking blade. I probably should have actually looked at a Mideastern style blade before I made this one, too late now. One Damascus bar on the top edge was not manipulated, serpentine in the middle with a twisted waterfall on the cutting edge.

At last confidence in composite construction, one step closer to the Nordic sword.
The Viking Broadsword
With confidence in tact, I started with 6-3 foot patterned bars. 3 of which are forge welded together end to end on one side of mild steel. Then I repeated it the same way again on the other side. Now the cutting edge would be 200 layers of high carbon steel notched and then flattened for the pupose of patterning. Then I continually welded around the core from point to guard in one piece. 
This is the example of this procedure if the sword was cut and you are looking at the inside construction. The gray color being the mild steel center, the blue color being the patterned steel, and the purple or fushia being the outer cutting edges.
I can see why these blades can be masterpieces, because the multiple patterns can be absolutely beautiful. It took me 7 days to construct my first Viking broadsword.
My wife, Linda being a daughter of a Norwegian immigrant requested a Viking broadsword, so I was eagar to oblige her. With my stamp on one side and a double L stamp for Linda Lou on the other side.
With the trait of grand chivalry, My queen is presented the Viking Broadsword
The Quest continues...
It's now spring 2004, searching for information I bought a "Blade" Magazine and found that there was a knife show in Eugene, OR. This was a must do! So Linda and I made arrangements to check it out. I had never been to one before this.
Thru my forging blade endeavors I had met up with a fabricator and tool man named James at my supplier who was interested in blades himself. In this quest for information on bladesmithing sharing information is crucial. His knowledge of Metallurgy and products brings welcome advice and updates.
James attended the knife show as well with his wife Jenny. This show was absolutely huge! Masters of all aspects of Bladesmithing, Knife making, and artisans of patterned steel from simply breath taking to extremely complex matter of artwork. You really have to see it to believe it. This inspired me to make some smaller blades.
Practice the Damascus
I decided to make a few skinner type knives. Try testing for hardness and practice suface manipulations also simple twisted laminates. So that I did...I don't consider myself a knife maker, but I will try to learn.
So I produce a few...one in particular was manipulated different on each side, It was laying on the dining room table as an exampleof the Damascus steel blade for family and friends to see when visiting. Jerry and Rosa, long time family friends (and the best salsa makers ever) from Silver Lake, WA came to visit. Jerry liked the skinner and also a filet knife I made. He wanted to make a trade with me...His black powder Hawkins 50 cal. rifle with extra 54 cal. barrel and all the accessories for the two blades and 1 more filet knife in his design customized just for him. I like black powder weaponry so I agree to trade and proceeded to forge his custom filet. I added a bronze fish head and tail on the handle trying to give him a little extra for his original. It turned out beautiful and now I'm the proud owner of a Hawkins black powder rifle 54 cal. and 50 cal. and its a nice addition to my 50 cal. Kentucky pistol.


